Pages

Showing posts with label Windows 7. Show all posts

Friday, May 6, 2011

How to open each file in new window in Excel 2010


Overview

You are using Excel 2010 (May for for Excel 2007 as well). You want to open each file in Excel as separate window. By default Excel 2010 (and Excel 2007) opens each file within the Excel Program. Excel 2010 and 2007 are designed as MDI applications.

Disclaimer

This is not Microsoft supported option. Although this has worked well for me, use caution as this approach includes on undocumented registry changes suggested by many other internet search results. It was confusing to try out all the options and get the result correct.  I wanted to share clearly given my situation what has worked.

Other Considerations

Being able to open each file in new window means being able to run new instance of Excel.exe program, that means you are using more memory. So use caution while trying to open more files when you have your excel program configured for this situation.

My Platform

  • Windows 7 x64 Ultimate (I Guess any editions might result with same behavior)

  • Office Professional Plus 2010 (I Guess any editions might result with same behavior)

    My Settings

    To make .xlsx file open in new window.

  • Open registering editing tool.

  • Navigate to “HKEY_CLASSES_ROOT\Excel.Sheet.12\shell\Open”

  • Right click on “Open” note and and export to file to save as backup.

  • Go to “Command” node.

  • Update the “Default” key to below value

    "C:\Program Files\Microsoft Office\Office14\EXCEL.EXE" /e "%1"


  • Rename the “Command” key below the “Default” key to “CommandOld”

  • Rename the “ddeexec”  Node to “ddeexecOld”

    You should see your registry changes similar to below pictures after change has been made:

    image

    image

    Now give it shot by open the “.xlsx”  files, you will see each file is opened in new window.

    Beware each Excel.xxxx  registry key is for each type of file that Excel as association with.

    For other type of extension based files fine below nodes and based on that I guess you can figure out your other type of files that you want to open to be configured the same.

    File Type to Open Registry sub key File Version
    For .xlsx Excel.sheet.12 Excel 2010 file
    For .xls Excel.sheet.8 Excel 2003-2007 file
    For .csv Excel.CSV Comma separated file

    Happy Excelling with more windows!

    Technorati Tags:
  • Wednesday, December 9, 2009

    Bootable VHD in Windows 7 for Win 2008 R2 x64, SQL 2008, SPS 2010, VS2010, WF4

    You can refer to my other post on this effort. Finally I was able to get a bootable VHD under Windows 7. I wanted to share what finally worked for me.

    • With my base bootable image Windows 7 x64 Ultimate, only the Fixed VHD seems to work.
    • The Fixed VHD must be on the local drive, meaning no external connected drives through USB, ESATA (Yes this is possible see my other post).
    • So the above restriction put limit on my maximum size I could apply for my VHD (20GB)
    • Here are some of my recordings of space requirements:
      • Software Space Required
        Windows 2008 R2 x64+IIS 6.7GB
        VS.Net 2010 (C#,Web Dev, SPS Dev) Including all pre-requisites 3.3GB
        SQL Server 2008 2GB
        SPS 2010 2.3GB
    • After all the components installed and ready to go with SPS CA created, I had only about 3.3 GB left.
    • So I think if you are planning for this task, plan for your storage well in advance, I would say at least 25-40GB for the VHD if you can afford the space.
    • When I created the VHD as fixed disk, the install and booting went well. Finally when everything started working, I felt that I been missing my productivity tools where were on my base Windows 7 install.
    • So finally I am ended up going back to my VMware Workstation option, and here are couple of reasons.
      • Microsoft VPC 2007 did not support x64 bit OS.
      • VMWare Workstation 7 supported Windows 2008 x64 bit.

    Monday, December 7, 2009

    Bootable VHD in Windows 7 using Pre-Built Hyper-V VHD file

    Overview

    On my lap top currently I run Windows 7 x64  and MOSS 2007 and I am very happy with it (no more VPC, VMWare  or carry that heavy external Hard Drive). See Current Specs below.

    I tried to install SPS 2010 on the same base install where I had MOSS 2007 already installed( see my other post before you try…)

    This time I am trying to create new multi bootable  partition from a VHD that is attached on my base Windows 7 install.  While there are many good references to get started, I wanted to share my experience of how I got my build done.

    My goal is to load create a new VHD where I can load all the next generation Beta products. This to include SPS 2010 Beta, VS2010 and all other supporting/necessary components.

    Current Specs

    Dell Latitude D630  (x64)
    4GB RAM
    Windows 7 x64 Ultimate
    SQL Server 2008 SP1
    VS.net 2008 SP1
    MOSS 2007 SP2 Oct CU
    Office 2010 Beta
    SPD 2007

    References
    1. http://www.hanselman.com/blog/LessVirtualMoreMachineWindows7AndTheMagicOfBootToVHD.aspx
    2. VHD-Extender toolkit
      1. http://vmtoolkit.com/blogs/announcements/archive/2007/01/17/vhd-expander-available.aspx
    Solution

    To start with I am repurposing Microsoft provided Windows 2008 R2 VHD pre built Hyper-V Virtual machine but has 180 day evaluation license, which is good enough at the movement  as SPS2010 and VS2010 are still in beta for at least next few months (3-6months).

    • So I downloaded the image, extracted and repurposed only the base VHD file.
    • The base VHD is only about 6.7GB.
    • Next attached the VHD in Windows 7 and I was able to see the content of the drive.
    • Following the bcdedit scripts I finished the dual bootable configuration.
    • Upon booting, the boot failed with the green screen error message says that the size of the drive is too small.
    • So next I utilized the VHD-Extender tool to extend the file, the version of the VHDExtender game an option extend only to minimum of 127GB. Which I did and this will be extended to a new file.
    Steps
    1. Download the Windows 2008 VHD (Reference link 2)
      1. clip_image001 
    2. Run the xxx-part01.exe and let the extract complete.
      1.  clip_image002
      2. clip_image003
    3. The extract process will create a folder structure, which is a pre configured Hyper-V virtual machine.

      1. image

    4. From all of this all I am interested is the VHD file. So navigate to the following folder to find VHD file.

      1. image

      2. image

    5. Extending the original 6.7GB VHD to 127GB file using the VHDExtender

      1. image

      2. clip_image016

    6. Now from the Windows 7, from the Computer Manager, navigate to Storage>Disk Management, right click and choose Attach VHD
      1. clip_image005
      2. clip_image006
      3. clip_image007
      4. clip_image008
      5. clip_image009
      6. clip_image010
      7. clip_image011
    7. Using BCDEdit, create new Boot entry
      1. clip_image012
    8. Copy the new GUID  from above command
      1. clip_image013
    9. Now follow next steps of BCDedit commands as below
      1. clip_image014
    10. Validate the registration
      1. clip_image015
    11. Reboot and choose the new Windows 2008 partition to boot.
      1. image

    12. After choosing to boot from the new partition, I got below error with status code ”0xc000000e”
      1. image
    13. Reboot with Windows 2008 R2 DVD
    14. Choose Repair Windows
      1. photo
    15. Now notice that on the Windows 2008 partition, the drive size seems to be displayed as 0MB and the location is unknown.
      1. photo
    16. When I rebooted with the base Windows 7,  I noticed that the Attached VHD drive is no more in the list of drive under my storage management (Computer Management console).
    17. Now I tried attaching the drive and trying to reboot, it seems that the VHD from the Hyper-V is not quite recognizable under this Windows 7 VHD attach process.
    18. Further search led me to confirm that there might be an issue with this process with some one who had tried similar approach (http://blog.frankovic.net/2009/05/boot-win-2008-r2-rc-from-vhd/)
    19. After further through I realized why the System Recovery Option was not displaying the partition size and the location.
      1. The drive where I stored the VHD is on an external drive that is connected to my lap top via ESATA connection.
      2. When the lap top was rebooted, the BIOS does not know or have the ESATA drivers and hence the VHD was not at all identified.
    20. Next Steps
      1. So my next steps are to really create a new VHD from scratch, install OS and go from there.
        1. OR
      2. Try with the base prebuilt Win 2008 R2 VHD which is 6.7GB by copying the VHD to my local lap top drive.
        1. This option just did not work at all. When rebooted the windows never came up, always received BDOS.
    21. See my next post for my results.
    22. To clean up current configure simply ran bcdedit /delete as below:
      1. image 
    Final Update

    When I created the VHD as fixed disk, the install and booting went well. Finally when everything started working, I felt that I been missing my productivity tools where were on my base Windows 7 install.

    So finally I am ended up going back to my VMware Workstation option, and here are couple of reasons.

    Microsoft VPC 2007 did not support x64 bit OS.

    VMWare Workstation 7 supported Windows 2008 x64 bit.

    Saturday, December 5, 2009

    Installing SPS 2010 side by side MOSS 2007

    Overview

    I have gone local with my Windows 7 install running MOSS 2007 (No more VPC/VMWare) on my lap top and I am really happy with it. I wanted to try and see what happens if I tried installing SPS 2010 Beta along side of MOSS 2007 install. I know Microsoft said it is not supported. But just for the kick…

    Test results

    I followed all the referenced as listed under the References section below to get through the Pre-Requisites which really went with no issues. (I will post my install experience when I finally get successful in another post). To save time of you all reading this post, finally when I got to the point when I ran the SPS 2010 install, this is what I saw…

    image

    I am not sure why Microsoft made this restriction but that's where I am being forced to try other option.

    Next Steps

    There is lot of buzz around the new Windows 7 support to load the VHDs as another bootable mount drive. So I am trying that option next to run the SPS 2010 as separate install and still make use of my Lap Top full potential. Will post my results in my next post….

    Reference
    1. MSDN:
      1. Setting Up the Development Environment for SharePoint Server
      2. http://msdn.microsoft.com/en-us/library/ee554869(office.14).aspx
    2. MSDN Blog
      1. SharePoint 2010 Pre-Requisites Download Links
      2. http://blogs.msdn.com/opal/archive/2009/10/25/sharepoint-2010-pre-requisites-download-links.aspx

    Installing MOSS 2007 on Windows 7

      Overview

      After Windows 7 was RTMed, I wanted to once again refresh my Lap Top with the released version as supposed to running the old RC version which would have timed out in July 2010. With the RC version I had the SQL Server 2008 and MOSS 2007 installed on my Windows 7 RC install. Worked very well.

      But this time once again I have to work through some of the challenges to get the MOSS install kick in. So I had followed all the steps as given in the below references, but wanted to add little more clarity to some of the steps and also share my steps that made it work finally.

      Also thanks to the Bamboo Solutions folks (Jonas Nilsson) for writing the program that fakes the MOSS installer that our Windows 7 really the server and let the install program continue. Randy Williamsfrom Synergy for sharing a small trick that did the one more trick that SharePoint.exe to be renamed back to setup.exe.

      Here goes my little contribution…

      References

      http://community.bamboosolutions.com/blogs/bambooteamblog/archive/2009/05/07/installing-wss-3-0-moss-sp2-on-windows-7-rc.aspx

      http://community.bamboosolutions.com/blogs/bambooteamblog/archive/2008/05/21/how-to-install-windows-sharepoint-services-3-0-sp1-on-vista-x64-x86.aspx

      http://www.synergyonline.com/blog/blog-moss/Lists/Posts/Post.aspx?ID=89

      Steps

      Follow all the steps in sequence as dictated by the first two links in my reference.

      Tip 1:

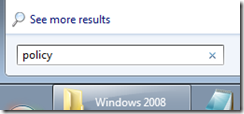
      In order to turn of the Application Compatibility, if you search “policy” in Windows 7 as below,
      image

      you will be search displayed as below…

      image

      Choose the “Edit group policy”, otherwise you can simply run “gpedit.msc

      Tip 2:

      If you have renamed the original “<your MOSS 2007 Install Folder>x64\setup.exe” to sharepoint.exe, I kept on getting the help menu for extract command, so when I tried renaming sharepoint.exe back to “setup.exe” in the Install got kick in…

      clip_image002

      Tip 3:

      Once all the above issues have been resolved, I was able to get the MOSS 2007 installed. Next I updated with latest SP 2 and the October 2009 CU, then ran config wizard and completed the Central Administration created.

      Now I fired up the Central Administration in a browser and found little strange display under the Topology and Services options. The “Services On Farm” was not displayed.
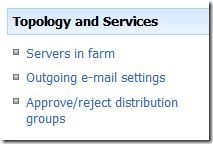
      clip_image003

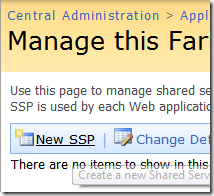
      As second test I tried to create a New SSP…
      clip_image004

      and got below error…

      clip_image005

      After checking my Local Users Group>Administrators, my Windows 7 login account was already part of administrator group (which I had already set up before I started with SQL Server and MOSS install steps).

      Then I figure this must be something in the Windows 7 UAC that may have not set correctly. But there was no option to check any more details.

      Then I ventured in to Local Security Policy to see if there are any policies that are blocking my account though who is member of local Administrator to act partially and blocking my full access/permissions to above problem..

      Then I search for [not literally] “Can I turn off UAC?” and ended up with a nice guide from TechNet (http://technet.microsoft.com/en-us/library/cc709691(WS.10).aspx). Look for section “To disable Admin Approval Mode

      Now to run the Local Security Policy follow below steps:

      1. Click Start, click All Programs, click Accessories, click Run, type secpol.msc in the Open box, and then click OK.

      2. If the User Account Control dialog box appears, confirm that the action it displays is what you want, and then click Continue..

      3. From the Local Security Settings console tree, double-click Local Policies, and then double-click Security Options.

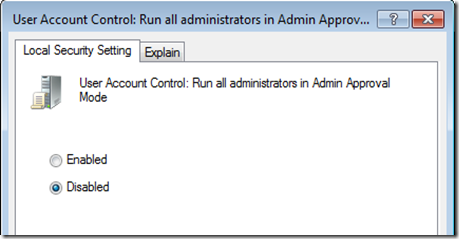
      4. Scroll down and double-click User Account Control: Run all administrators in Admin Approval Mode.

      image

      Select the Disabled option, and then click OK.
      image

      Close the Local Security Settings window.

      Now refreshed my CA and there you see all the missing options…

      clip_image006

      And further I was now able to create SSP and continue my journey running MOSS 2007 locally on Windows 7 happily….

      Next I want to install and test Office 2010 Beta but still want to run SPD 2007.. see my next post..